
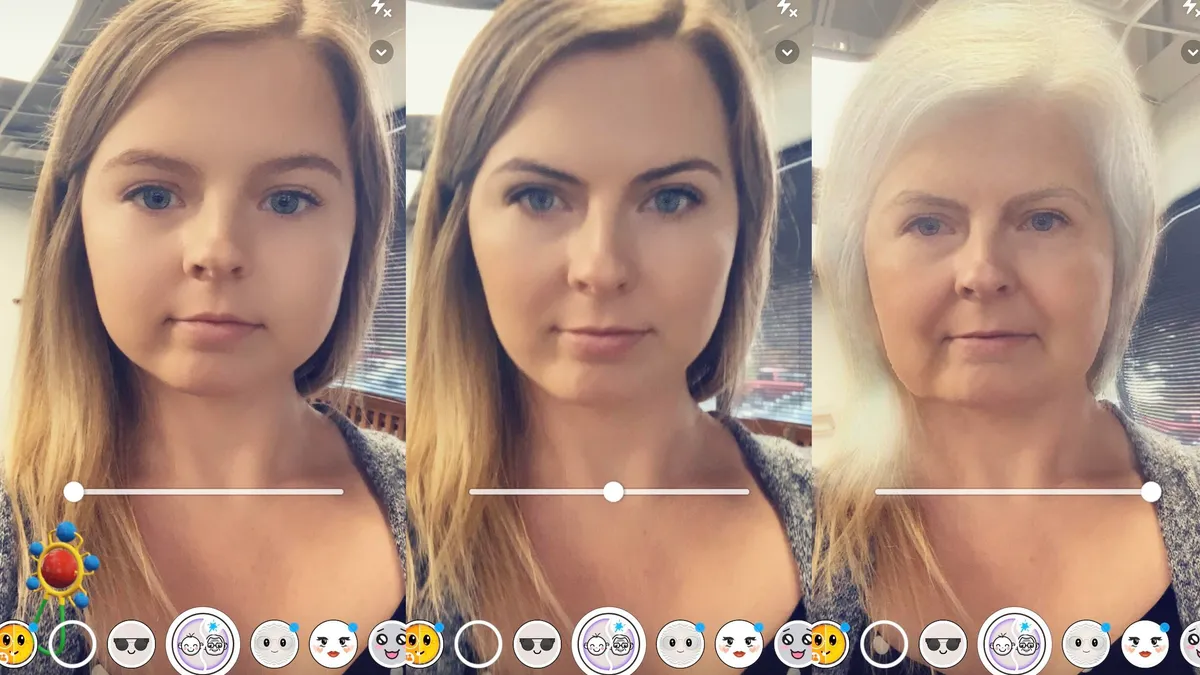
DiffAE: How to use AI to make your friends look bald, happy, young, blond, old - you name it!
Changing people's gender, age, expression, acessories, or hair with the DiffAE AI model.
Generating realistic image edits like changing someone's hair or facial features used to require professional photo editing skills. But with AI models like Diffusion Autoencoders (DiffAE), anyone can seamlessly modify portraits with just a few lines of code.
In this post, we'll learn how to use DiffAE to edit portraits by adding or removing various attributes like hair, facial hair, makeup, and more. Whether you're a photographer looking to streamline edits or a designer wanting to prototype ideas, this model makes it simple to get creative results.
We'll go over real-world examples of using DiffAE, explain how the model works, and provide sample code to help you get started. We'll also see how we can use AIModels.fyi to find similar models and decide which one we like. Let's begin.
Subscribe or follow me on Twitter for more content like this!
Real-world use cases
Here are just a few examples of how DiffAE can be used to edit portraits:
- Photographers can easily remove blemishes or make subjects look younger or older
- Fashion designers can prototype clothing and accessory ideas on model photos
- Makeover artists can showcase possibilities like new hairstyles for clients
- Social media influencers can quickly generate variations of their selfies
The AI-powered edits open up new creative opportunities for all kinds of artists and creators. Apps built with DiffAE could allow everyday users to have fun modifying selfies and profile pictures as well.
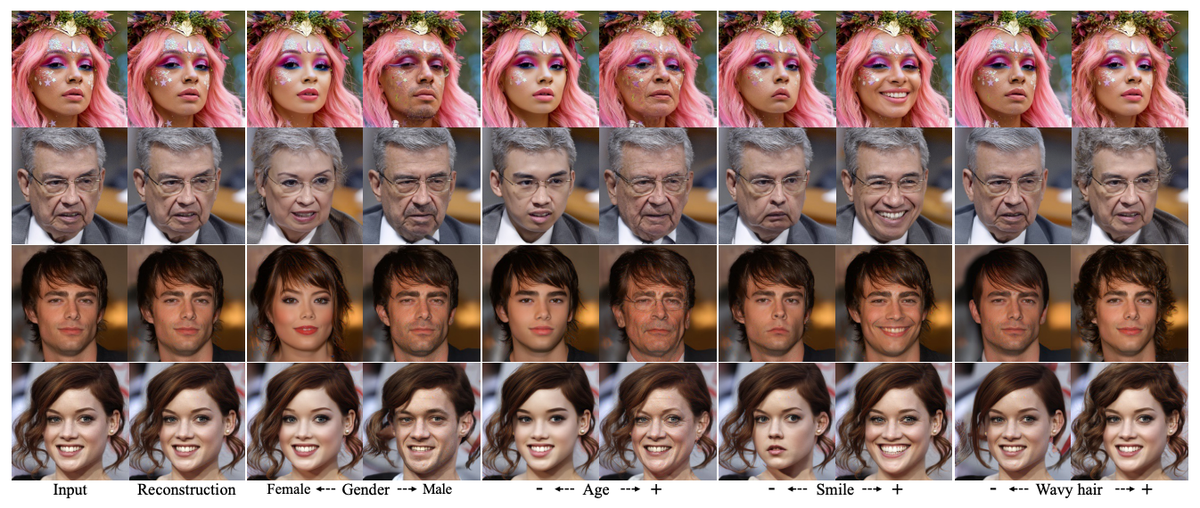
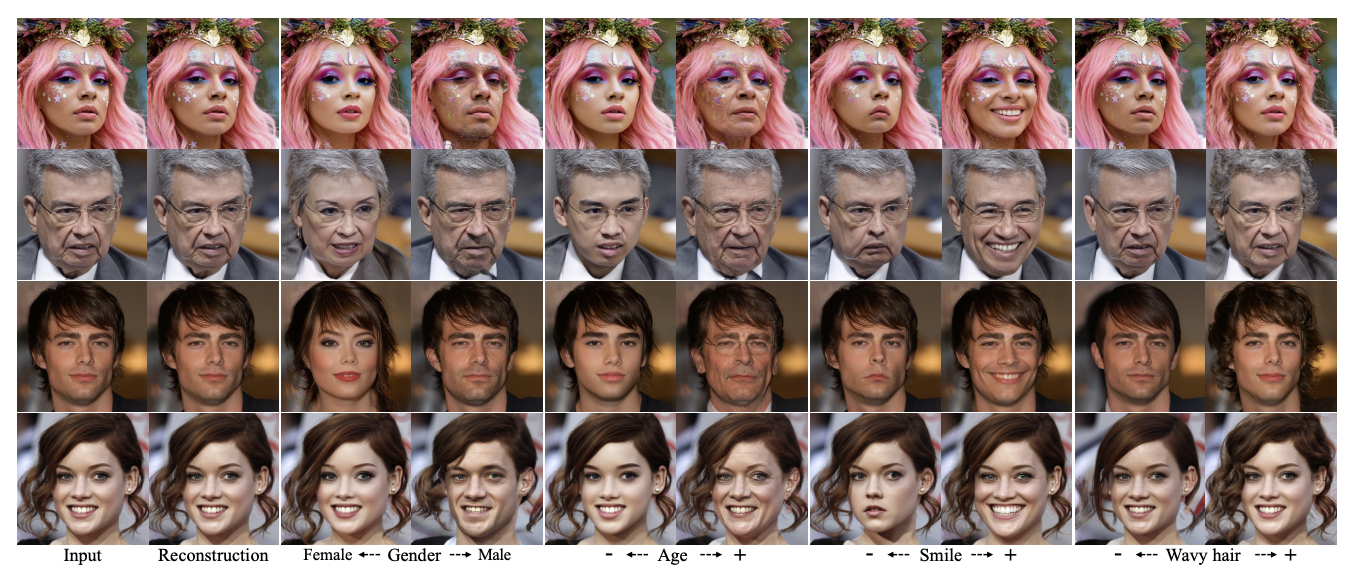
Examples
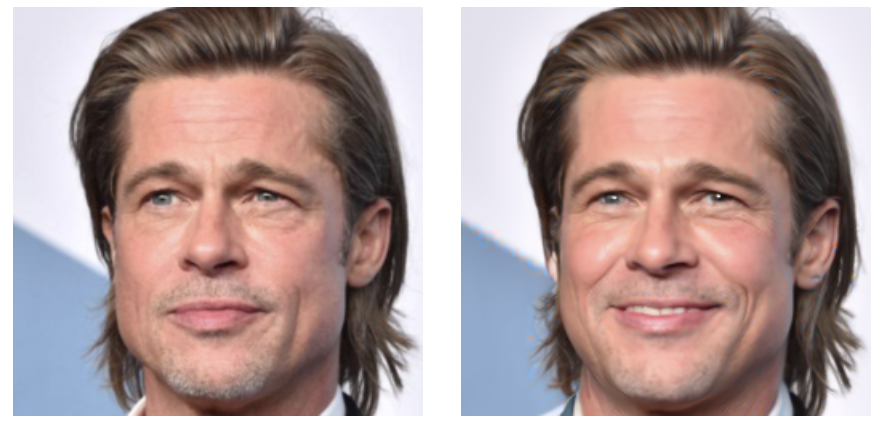
Here are just a few examples of what the model can do to real images of real people! Some of these changes - turning old people into young people, making sad people smile, or adding or removing accessories like glasses - look super realistic!
Note: You may be able to attain even better results by running your output through another model like an upscaler. You can learn more about how to do this here.
About the DiffAE model
DiffAE is an image-to-image model implemented and maintained by cjwbw and hosted on Replicate. It leverages a technique called diffusion models to manipulate images. It is hosted on Replicate and has an average runtime of 43 seconds with a cost per run of $0.02365. The hardware used is an Nvidia T4 GPU. More technical details and API specifications are available on its detail page.
The model takes in an input photo and optional parameters like "add bangs" or "make bald." It outputs a modified version of the original image with the requested changes. The diffusion process allows it to generate realistic, high-quality results.
Under the hood, DiffAE uses an autoencoder architecture. The encoder portion learns to represent the key features of an image, like hair and facial shapes. The decoder then transforms those features while preserving overall realism. This allows seamless modifications.
How does the DiffAE model work?
Let me first give you a technical explanation, then explain how the model works in plain English.
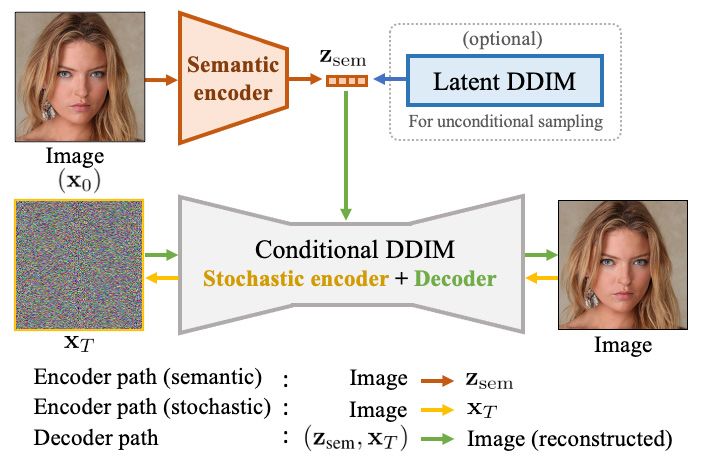
Technical explanation first! The diffusion autoencoder comprises two main parts: a semantic encoder and a conditional Denoising Diffusion Implicit Model (DDIM).
- Semantic Encoder: This takes an input image and converts it into what's called a semantic subcode. This subcode encapsulates the high-level, abstract features of the image.
- Conditional DDIM: This part performs two roles. As a stochastic encoder, it takes the original image and turns it into another form that captures the fine-grain, random variations. As a decoder, it takes both the semantic subcode and this fine-grained form to reconstruct the original image.
The semantic subcode captures the overarching themes, while the fine-grained form captures the minute details. Together, they can recreate the original image almost exactly.
To create new samples, the autoencoder uses a latent DDIM that is trained on the distribution of the semantic subcodes. During sampling, new subcodes and fine-grained forms are generated from a standard Gaussian distribution and then decoded to create a new image.
Make sense? If not, let's look at it again in plain English:
Imagine the diffusion autoencoder as an advanced art student who excels at capturing the essence and minute details of a painting.
- Semantic Encoder: First, this student looks at a painting and understands its deep meaning—the mood, the themes, the emotions. This is like the "semantic encoder" part, which understands the high-level, abstract features of the image.
- Conditional DDIM: Then the student pays attention to the brush strokes, the variations in color, and the tiny details. This is similar to the "stochastic encoder" that captures the small, random details in the image. Finally, the student can then recreate the painting by combining what they understood about its deeper meaning and its fine details, acting as a "decoder".
So basically, one part understands what the image is about (the "big picture"), and the other part gets how the image is made (the "tiny details"). When you put both together, you can recreate the original image or variants that match very closely.
To make new art, our student would use their understanding of many different paintings to create a new masterpiece by combining a new big-picture idea with new tiny details.
Limitations of DiffAE
While DiffAE is versatile and effective, it has its set of limitations:
- Limited to Portraits: The model specializes in portrait images and might not perform well on other types.
- Computational Cost: The model takes an average of 43 seconds to run, which may not be ideal for real-time applications.
- Artifacts on High Amplitude: When the manipulation amplitude is set too high, it could result in artifacts.
- Cost per Run: At $0.02365 per run, it might be expensive for bulk operations.
Model inputs and outputs
Here's a breakdown of the input properties and output schema for the AI model specialized in face manipulation. This is critical information for anyone, especially founders and developers like you guys building AI products, who need to know what exactly they're working with.
Input Properties
image file
- Description: This is your raw material. Provide an image file for the face that you want to manipulate. The model takes care of alignment and cropping.
- Usage: Simply upload the image you want to alter.
target_class (string)
- Description: Here's where you get to choose your manipulation vector. Want a 5_o_Clock_Shadow or Bushy_Eyebrows? You decide.
- Usage: Provide one of the allowed values like "Big_Nose", "Smiling", etc.
- Default: "Bangs"
manipulation_amplitude (number)
- Description: Think of this as the intensity control. Cranking this up too high could lead to artifacts or unnatural results.
- Usage: Feed a numerical value. Higher values equate to stronger manipulations.
- Default: 0.3
T_step (integer)
- Description: This is essentially your 'frames per second' for the generative model. More steps can mean smoother transitions.
- Usage: Choose from one of the allowed integer values like 50, 100, etc.
- Default: 100
T_inv (integer)
- Description: An enumeration parameter, though its exact functionality is unspecified here.
- Usage: Just like
T_step, pick an integer from the allowed values. - Default: 200
Output Schema
Your result comes in a JSON format with the following structure:
{
  "type": "array",
  "items": {
    "type": "object",
    "title": "ModelOutput",
    "required": [
      "image"
    ],
    "properties": {
      "image": {
        "type": "string",
        "title": "Image",
        "format": "uri"
      }
    }
  },
  "title": "Output"
}
Output schema
Here's what each element means:
type: "array"
- This suggests you could get multiple output items, each as an object.
items:
type: "object"
- Each object in the array represents one output from the model.
title: "ModelOutput"
- Just an identifier for your output.
required:
- ["image"]
- Indicates that an "image" field will always be present.
properties:
- image:
- type: "string"
- The output image won't be raw bytes but a URI string.
title: "Output"
- The title for the entire output schema.
You can read more information in the Diffae Replicate API spec here.
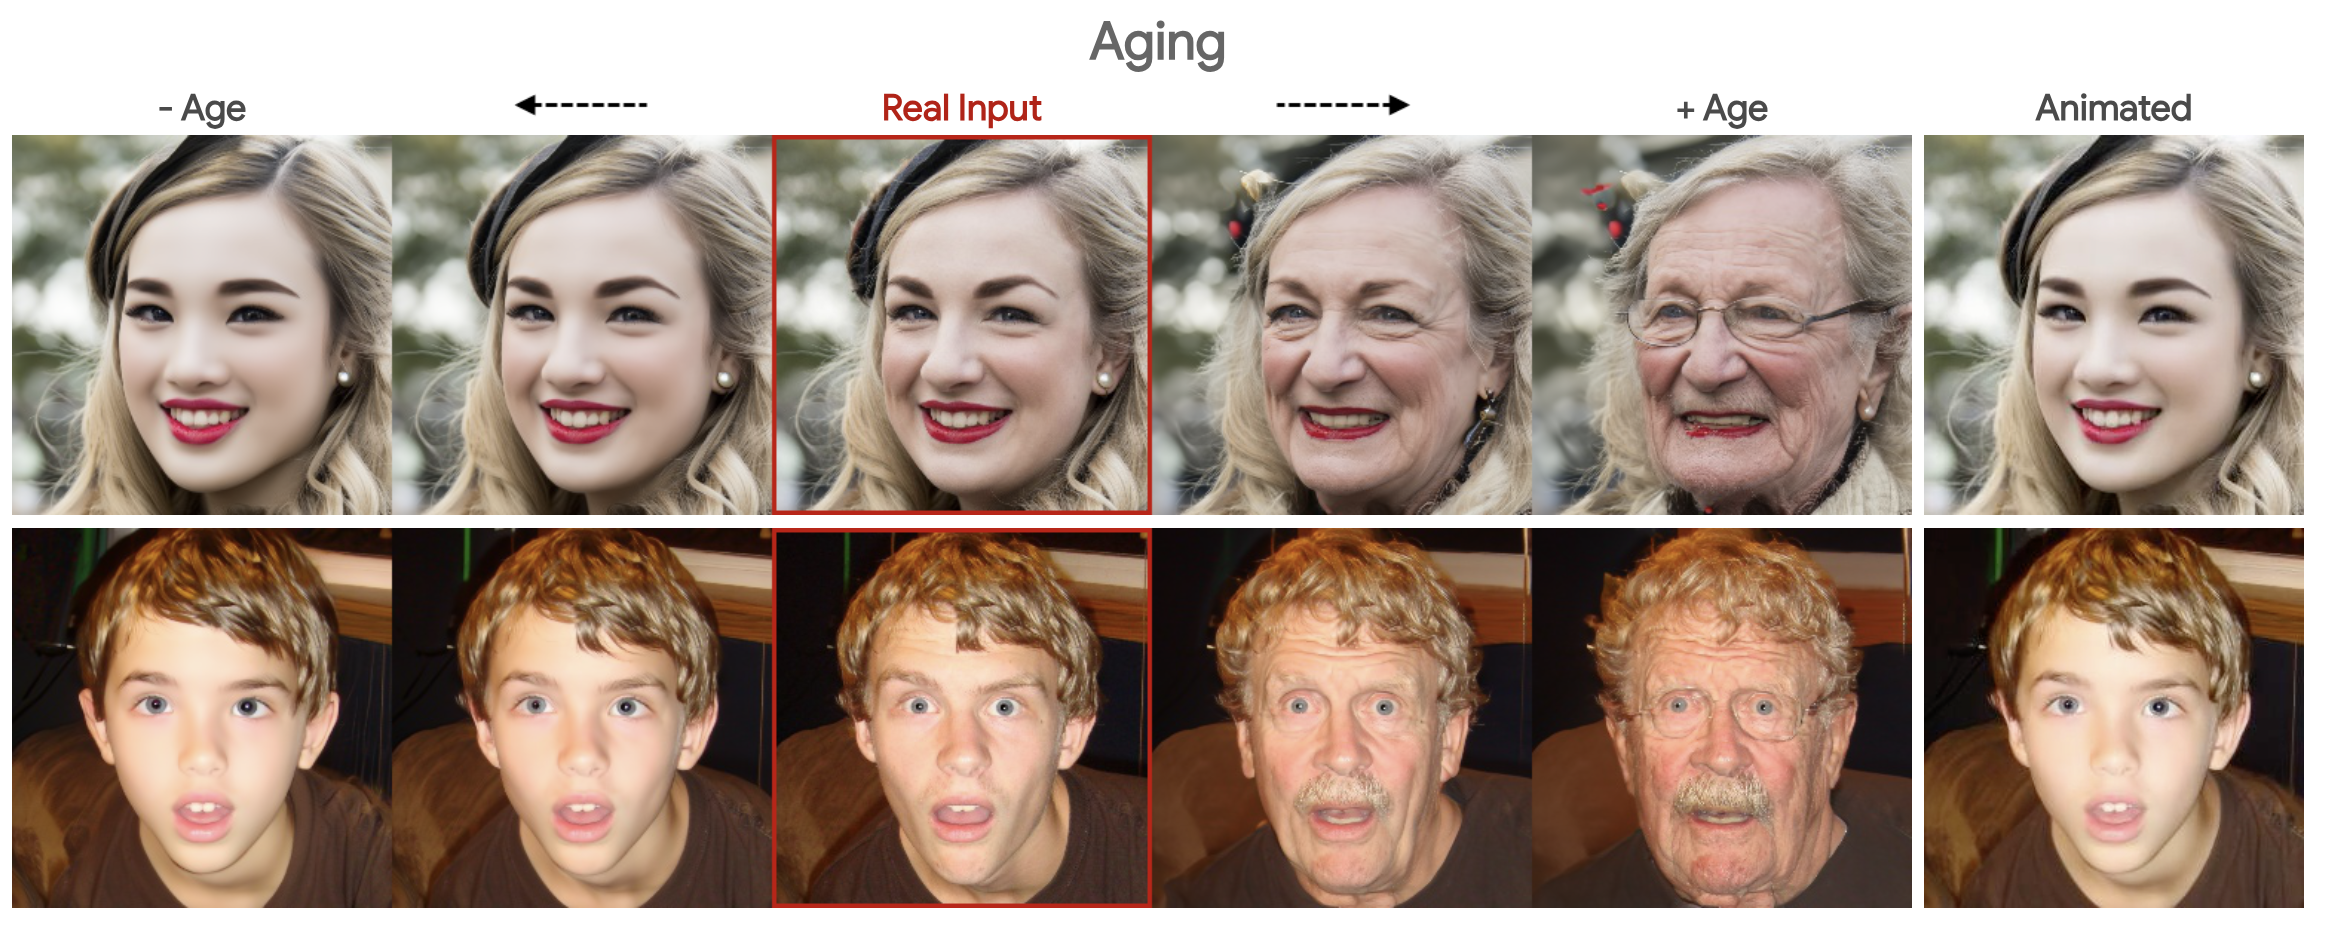
Step-by-Step Guide: Aging a Face with DiffAE
Ok, ready to fire up DiffAE to build your own face-modifying app? You've come to the right part of the guide!
In this example, we'll build a basic script we can use in a product that will artificially age people to show them what they'll look like when they're older. This is a popular feature in applications like Snapchat.
Here's a step-by-step guide, with code snippets to help you pull this off. This example uses Node.js and the Replicate API to manage the whole operation.
Pre-requisites:
- Node.js installed
- Replicate API token
- Image to manipulate (
young_face.jpgin our example)
Step 1: Install Replicate Package
First thing's first, you need to install the Replicate package for Node.js.
npm install replicate
Step 2: Authenticate with Replicate
Go get your Replicate API token and set it as an environment variable:
export REPLICATE_API_TOKEN=<paste-your-token-here>
Step 3: Write the Node.js Script
Create a new Node.js file (make_old_with_webhook.js) and let's get started with the coding part. We'll be using webhooks, so also include axios for the HTTP call for the webhook.
npm install axios
import Replicate from 'replicate';
import axios from 'axios';

const replicate = new Replicate({
  auth: process.env.REPLICATE_API_TOKEN,
});

const imageFilePath = './young_face.jpg';
const imageBase64 = fs.readFileSync(imageFilePath, { encoding: 'base64' });

// Using the `run` method to age the image
const output = await replicate.run(
  'cjwbw/diffae:5d917b91659e117aa8b0c5d6213077e9132083e4a8a272f344cc52c3ba2f6e98',
  {
    input: {
      image: imageBase64,
      //add your other parameters here. Ex: target_class of Gray_Hair
    },
  }
);

// Using the `predictions.create` method with a webhook
const prediction = await replicate.predictions.create({
  version: '5d917b91659e117aa8b0c5d6213077e9132083e4a8a272f344cc52c3ba2f6e98',
  input: {
    image: imageBase64,
  },
  webhook: 'https://example.com/your-webhook',
  webhook_events_filter: ['completed'],
});

// Implement your webhook to receive the processed image asynchronously
// Assuming an Express.js setup:
app.post('/your-webhook', (req, res) => {
  const processedData = req.body.data;
  // Handle the processed data
  res.status(200).send('Received');
});
A couple variables to take note of:
version: The specific version of the model you are using.input: The actual data you are sending for processing, here it's the base64 image string.webhook: The URL to call when the prediction is complete.webhook_events_filter: List of events that will trigger the webhook. Here we are usingcompletedto indicate that the webhook should fire when the prediction is done.
Step 4: Run the Script
Execute your script:
node make_old_with_webhook.js
Once the prediction is complete, your webhook URL will be triggered, and you'll receive the processed image there.
Troubleshooting
Encountering issues with your script? Check the following:
- Ensure your API token is valid.
- Make sure the image file path and the base64 encoding are correct.
- If the webhook isn't firing, check the URL and your server logs.
Conclusion
So, we've taken a deep dive into DiffAE, understanding its capabilities, technical specs, and even how to get your hands dirty with the code. Now, what's next? You've got this powerful tool at your disposal, and there are limitless possibilities.
Future Steps
- Optimization: Now that you know the basics, the next step is to optimize your workflow. Can you speed up the run time? Can you batch process multiple images to make the most out of your investment?
- Combine Models: Use AIModels.fyi to explore other models that you can integrate with DiffAE for even more powerful image manipulations. Maybe combine it with a model that enhances image quality or does background removal?
- Build an App: Consider building an application or integrating it into an existing one. With the API setup, it's totally doable to have an app where users can upload a photo and tweak it based on preset categories like 'smiling', 'tired', etc.
- Stay Informed: If you haven't already, consider subscribing to the AIModels.fyi mailing list. We offer concise digests, expert guidance, and a community of AI enthusiasts to help you stay on the cutting edge.
With that, you're well-equipped to forge ahead into the creative universe that DiffAE opens up. So go forth and hack away!
Subscribe or follow me on Twitter for more content like this!
Further reading
The resources below can help you out if you get stuck or just want to learn more about DiffAE.
- Understanding DiffAE: Technical Paper: This Arxiv paper provides a deep dive into the technical specifics and mathematics behind the DiffAE model.
- Replicate Implementation of DiffAE: Check out this practical implementation of DiffAE on Replicate, complete with examples to help you understand its applications.
- DiffAE on AIModels.fyi: This is the detail page for DiffAE on AIModels.fyi, where you'll find comprehensive info like capabilities, run time, and cost.
- DiffAE GitHub Repo: The official GitHub repository for DiffAE. Great if you're looking to fork the project or contribute.
- Exploring the World of AI Art: A Guide to StyleGAN and DALL-E: This article from AIModels.fyi Notes explores the fascinating world of AI-generated art, covering popular models like StyleGAN and DALL-E.
- A Beginner's Guide to StyleCLIP: Another piece from AIModels.fyi Notes, this time focusing on how to get started with StyleCLIP, a model that leverages both text and images.

Comments ()