
Let Your Words Shape Images: How to use Glid-3-xl
A beginner's guide to using the Glid-3-xl model to convert your text into stunning visuals

The power to shape visuals just by writing some lines of text sounds like a magic trick, doesn't it? What if I told you, it isn't magic, it's AI. Specifically, an AI model named Glid-3-xl.
It's an absolute game-changer, helping us bring our wildest textual descriptions into stunning visuals.
In this guide, I'll walk you through how to use this magic wand, from understanding its workings to using it for your creative projects. The Glid-3-xl is currently ranked 104 on AIModels.fyi, a fantastic resource for exploring a variety of AI models.
And guess what? We'll also see how we can use AIModels.fyi to find similar models and decide which one we fancy. Excited? Let's get started!
About the Glid-3-xl
Created by the talented Jack000, the Glid-3-xl model is a marvel of modern AI technology. It is a 1.4 billion parameter Text-to-Image model from CompVis, finetuned on CLIP text embeds and curated data.
What does this mean in layman's terms? Well, imagine you describe a beautiful sunset over a lake with swans. The Glid-3-xl will take that description and generate a stunning image that captures your description. Isn't that fantastic?
If you're keen on diving deeper into the model's specs, feel free to explore the model's detail page.
Understanding the Inputs and Outputs of the Glid-3-xl Model
Before we get our hands dirty with the code, let's understand how to talk to Glid-3-xl... what inputs does it need, and what outputs does it give us?
Inputs
Glid-3-xl needs certain information to create the magic. Here are the main inputs it requires:
prompt string: Your text prompt. The description of the scene you want to visualize.negative string(optional): Negate the model's prediction for this text from the model's prediction for the target text.init_image file(optional): Initial image to use for the model's prediction.init_skip_fraction number: Fraction of sampling steps to skip when using an init image.
Outputs
Once you provide these inputs, Glid-3-xl gives you an output in the following schema:
{
  "type": "array",
  "items": {
    "type": "string",
    "format": "uri"
  },
  "title": "Output",
  "x-cog-array-type": "iterator"
}
Essentially, it generates an array of URIs, which are links to the images it has created based on your input prompt.
Now, let's dive into how we can interact with this amazing model.
The Magic Wand in Action - Using the Glid-3-xl Model
Now, let's start using this magic wand to shape images. And, don't worry if you're not into coding, you can still interact directly with Glid-3-xl's "demo" on Replicate's user interface. Try it out here. It's a great way to play with the model's parameters and get some instant feedback.
However, if you're up for some coding fun, this guide will help you interact with the Glid-3-xl's API. Here's how to do it:
Step 1: Install the Node.js client
First, you need to set up your environment. If you're using Node.js, install the replicate client using the npm command: npm install replicate.
Step 2: Authenticate with your API token
Next, you need to authenticate yourself. Copy your API token and set it as an environment variable: export REPLICATE_API_TOKEN=<paste-your-token-here>.
Step 3: Run the Model
Finally, you're ready to ask Glid-3-xl to create an image for you. Here's how:
import Replicate from "replicate";

const replicate = new Replicate({
  auth: process.env.REPLICATE_API_TOKEN,
});

const output = await replicate.run(
  "jack000/glid-3-xl:3ab3bf32ffee63490913279e39948bd72b0eb5da1317288c3de6d4546344c167",
  {
    input: {
      prompt: "..."
    }
  }
);
You can also set a webhook URL to be called when the prediction is complete. For instance:
const prediction = await replicate.predictions.create({
  version: "3ab3bf32ffee63490913279e39948bd72b0eb5da1317288c3de6d4546344c167",
  input: {
    prompt: "..."
  },
  webhook: "https://example.com/your-webhook",
  webhook_events_filter: ["completed"]
});
Setting a webhook is helpful if you want to be notified once the image generation is completed.
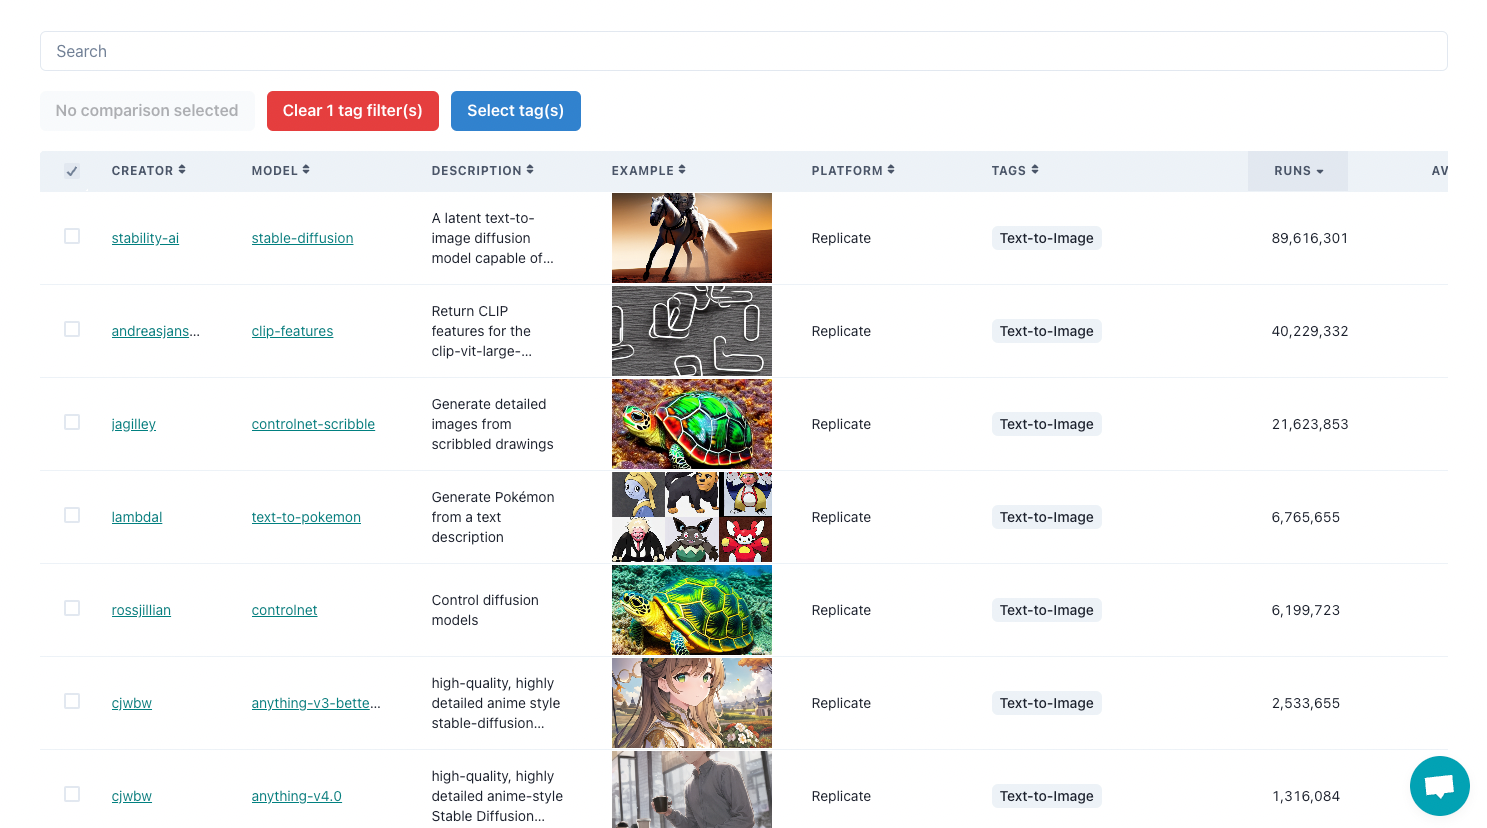
Taking it Further - Finding Other Text-to-Image Models with AIModels.fyi
AIModels.fyi is an incredible resource for discovering AI models, whether you're looking for image generation, text-to-image conversion, or much more. Here's how you can use it to find similar models to Glid-3-xl:
Step 1: Visit AIModels.fyi
Start your exploration at AIModels.fyi.
Step 2: Use the Search Bar
Type 'text-to-image' in the search bar. This will bring up a list of models related to your search.
Step 3: Filter the Results
To refine your search, use the filters on the left side of the search results page. Filter by cost, popularity, or specific creators.
Conclusion
In this guide, we explored the wonderful world of AI models, specifically, how to use the Glid-3-xl to bring our textual descriptions to life as visuals. We also learned how to leverage AIModels.fyi to find similar models and broaden our creative horizons.
I hope this guide inspired you to dive into the creative possibilities of AI. Don't forget to subscribe to Notes.AIModels.fyi for more tutorials, updates on new models, and a ton of creative inspiration for your next project. Happy exploring with AIModels.fyi! For more updates, check out my Twitter. Happy AI adventuring!
Subscribe or follow me on Twitter for more content like this!


Comments ()