
How to Upscale in Midjourney: A Step-by-Step Guide
How to make your images look better using Midjourney's upscale feature.
Upscaling is the process of increasing the size and details of an image while maintaining its original quality. Midjourney is a powerful image generation tool that allows you to upscale images using a variety of upscaler models. In this blog post, we will explore how to upscale images in Midjourney using different upscalers, dimensions, and settings.
Midjourney: What is it?
Midjourney is a grid-based image generator that starts by creating low-resolution image options for each job. You can then choose to upscale any image from the grid to increase its size and add more details. There are multiple upscaler models available for upscaling, and you can choose the best one for your specific image.
Upscalers: Light, Detailed, Beta, and Anime
| Model Version | Starting Grid Size | V4 Default Upscaler | Detail Upscale | Light Upscale | Beta Upscale | Anime Upscale | Max Upscale** |
|---|---|---|---|---|---|---|---|
| Default Model Version 4 | 512 x 512 | 1024 x 1024 * | 1024 x 1024 | 1024 x 1024 | 2048 x 2048 | 1024 x 1024 | - |
| Version 5 | 1024 x 1024 | - | - | - | - | - | - |
| v1–v3 | 256 x 256 | - | 1024 x 1024* | 1024 x 1024 | 1024 x 1024 | 1024 x 1024 | 1664 x 1664 |
| niji | 512 x 512 | 1024 x 1024 | 1024 x 1024 | 1024 x 1024 | 2048 x 2048 | 1024 x 1024 | - |
| niji 5 | 1024 x 1024 | - | - | - | - | - | - |
| test / testp | 512 x 512 | - | - | - | 2048 x 2048 | 1024 x 1024* | - |
| hd | 512 x 512 | - | 1536 x 1536* | 1536 x 1536 | 2048 x 2048 | - | 1024 x 1024 |
* = the default upscaler for each Midjourney Version Model.** Max Upscale is an older resource-intensive upscaler and is only available when users are in Fast Mode.
Midjourney offers several upscaler models to choose from, depending on your desired outcome:
- Light Upscaler: This upscaler is useful for faces and smooth surfaces when using older Midjourney Model Versions. It creates a 1024px x 1024px image and adds a moderate amount of details and textures. Use the
--uplightparameter to change the behavior of the U1 U2 U3 U4 upscale buttons to use the Light Upscaler. - Detailed Upscaler: This upscaler is the default for Midjourney Model Versions V1, V2, V3, and hd. It creates a 1024px x 1024px image and adds many additional fine details to the image. Images that have been upscaled with the Detailed Upscaler can be upscaled again using the Upscale to Max button for a final resolution of 1664px x 1664px. Upscale to Max is only available when in Fast mode.
- Beta Upscaler: This upscaler is useful for faces and smooth surfaces. It creates a 2048px x 2048px image without adding many additional details. Use the
--upbetaparameter to change the behavior of the U1 U2 U3 U4 upscale buttons to use the Beta Upscaler. - Anime Upscaler: This upscaler is the default upscaler for the
--nijimodel. It upscales images to 1024px x 1024px and is optimized to work well with illustrated and anime styles. Use the--upanimeparameter to change the behavior of the U1 U2 U3 U4 upscale buttons to use the Anime Upscaler.
Step-by-Step Guide to Upscaling in Midjourney
- Choose your desired upscaler: Begin by selecting the upscaler that best suits your image type and desired outcome. You can use the
/settingscommand to select your preferred upscaler from the menu. - Generate your grid: Start Midjourney by generating a grid of low-resolution images for your job.
- Select an image: Choose the image you want to upscale from the grid.
- Upscale your image: Click the U1, U2, U3, or U4 buttons under your selected image to upscale it using your chosen upscaler.
- Review your upscaled image: Once the upscaling process is complete, you can review your upscaled image and decide if it meets your requirements. If not, you can try upscaling with a different upscaler model or generate a new grid of images.
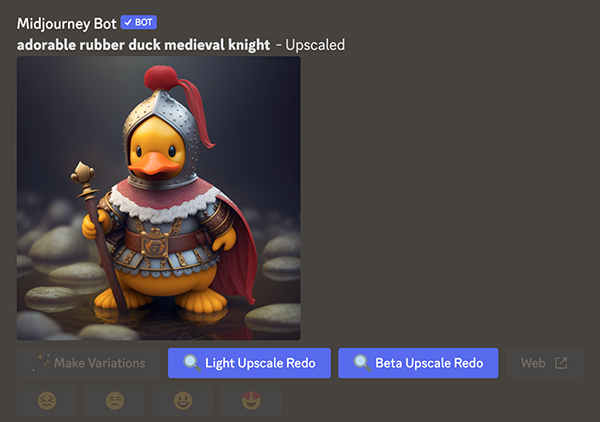
- Redo upscale: If you want to redo the upscale using a different upscaler model, you can use the ⏫ Regular Upscale, ⬆️ Light Upscale, or 🔥 Beta Upscale buttons underneath the image. These buttons let you redo the upscale with a different upscaler model.
- Remaster: If you have previously upscaled images made with the V1, V2, or V3 Model Versions, you can use the 🆕 Remaster button found beneath the original upscale to remaster the image. Remastering blends the composition of the original image with the coherency of the newer --test model, improving the overall image quality.
- Save your final image: Once you are satisfied with the upscaled image, save it for your desired use.
Tips for Using Midjourney
- The newest Midjourney Model Version 5 (and Niji 5) produces high-resolution 1024 x 1024 px image grids without needing an additional step to upscale each image. When using Midjourney Model Version 5, the U1 U2 U3 U4 buttons under each image grid will separate the selected image from the initial image grid.
- The default upscaler increases image size while smoothing or refining details. Some small elements may change between the initial grid image and the finished upscale.
- Keep in mind that Remaster has some limitations, such as only working with aspect ratios up to 2:3 or 3:2, providing inconsistent results with multi-prompts, and not working with image prompts.
By following this step-by-step guide, you can successfully upscale images in Midjourney using different upscalers, dimensions, and settings to achieve the best possible outcome for your images.
Subscribe or follow me on Twitter for more content like this!

Comments ()